How Transistors Work – A Simple Explanation
The transistor is a simple component that you can use to build a lot of fun projects. In this hands-on guide, you’ll learn how transistors work so that you can use them in your next circuit.
And it’s actually pretty easy, once you learn the basics. I’ll focus on the two most common transistors here; the BJT and the MOSFET.
![]() The transistor works like an electronic switch. It can turn a current ON and OFF. A simple way to think about it is to look at the transistor as a relay without any moving parts. A transistor is similar to a relay in the sense that you can use it to turn something ON and OFF.
The transistor works like an electronic switch. It can turn a current ON and OFF. A simple way to think about it is to look at the transistor as a relay without any moving parts. A transistor is similar to a relay in the sense that you can use it to turn something ON and OFF.
But a transistor can also be turned partly on, which is useful for building amplifiers.
How Transistors Work (BJT)
Let’s start with the classic NPN transistor. It’s a Bipolar Junction Transistor (BJT) and has three legs:
- Base (b)
- Collector (c)
- Emitter (e)
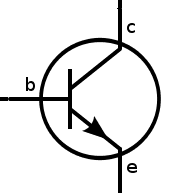 If you turn it ON, current can flow through it from the collector to the emitter. When it’s OFF, no current can flow.
In the example circuit below, the transistor is OFF. That means no current can flow through it, so the Light-Emitting Diode (LED) is also off.
![]()
To turn the transistor ON, you need a voltage of about 0.7V between the base and the emitter.
If you had a 0.7V battery, you could have connected it between the base and emitter, and the transistor would have turned ON.
Since most of us don’t have a 0.7V battery, how do we turn on the transistor?
Easy! The base-to-emitter part of a transistor works like a diode. A diode has a forward voltage that it “grabs” from the available voltage. If you add a resistor in series, the rest of the voltage drops across the resistor.
So you’ll automatically get around 0.7V by adding a resistor.
This is the same principle you use to limit the current through an LED to make sure it doesn’t blow up.
If you also add a pushbutton, you can control the transistor, and thereby the LED, ON and OFF with a button:
![]()
Choosing Component Values To choose the component values, there’s one more thing you need to know about how transistors work:
When a current flows from the base to the emitter, the transistor turns on so that a larger current can flow from the collector to the emitter.
![]() How transistors work (NPN)
There is a connection between the sizes of the two currents. This is called the gain of the transistor.
How transistors work (NPN)
There is a connection between the sizes of the two currents. This is called the gain of the transistor.
For a general-purpose transistor, such as the BC547 or 2N3904, this could be around 100.
That means that if you have 0.1 mA flowing from the base to the emitter, you can have 10 mA (100 times more) flowing from collector to emitter.
What resistor value do you need for R1 to get 0.1mA flowing?
If the battery is 9V, and the base-to-emitter of the transistor grabs 0.7V, then there’s 8.3V left across the resistor.
You can use Ohm’s law to find the resistor value:
Ohm’s law for resistance The Ohm’s Law triangle R = \frac{V}{I} = \frac{8.3V}{0.0001A} = 83000 \Omega
So you need a resistor of 83 kΩ. That’s not a standard value, but 82 kΩ is, and it’s close enough.
R2 is there to limit the current to the LED. You can choose the value you would have chosen if you were to connect the LED and resistor directly to the 9V battery, without the transistor. For example, 1 kΩ should work fine.
Check out the video explanation I made on the transistor a few years back (forgive the old-school quality):
How To Choose a Transistor The NPN transistor is the most common of the Bipolar Junction Transistors (BJT). But there is another one called a PNP transistor that works the same way, just that all the currents are in the opposite direction.
When choosing a transistor, the most important thing to keep in mind is how much current the transistor can support. This is called the Collector Current (IC).